Wicked Zombies

YOU ONLY LIVE ONCE...MAYBE TWICE!

Posted by Black Plague 11/30/2013

25 DIY Weekend Preparedness Projects.
http://foodstorageandsurvival.com/25-diy-weekend-preparedness-proje...

25 easy DIY prepper projects for preparedness and survival.Have some extra time on your hands?  Looking for projects you can do today (or this weekend) to be better prepared?  Well, look no further.  Here are 25 great weekend preparedness projects I’ve gathered up from around the web.  Great for the prepper, survivalist, or anyone wanting to be a little more prepared at the end of the day.  Each of these projects are fairly low budget (some only require your time and a piece of paper) and shouldn’t take longer than a couple of days to complete–many won’t take more than a couple of hours.  Tackle one (or more) this weekend and you’re that much more prepared than you were yesterday!

FOOD and COOKING Projects

1.  Make a rocket stove with empty cans.  You might need to have soup for lunch to get enough cans for this.

2.  Build a Solar cooker–The link has lots of different designs you could try–some even using those shiny vehicle windshield shades.  If you’ve got some extra time and a sunny day, try cooking something in your new cooker!

3.  Make your own homemade survival bars.  Be sure to read through the comment section on that post–there are some really good ideas for changing them up a bit.

LIGHT and FIRE Projects

4.  Make some dryer lint fire starters.

5.  Build a heater out of a candle and some terra cotta pots.

6.  Make a candle from a tub of Crisco.

7.  Make an oil lamp.

8.  Not enough light for you?  Okay, make a torch!  Just like in the movies!

WEAPONRY Projects

9.  Build a PVC bow.

10. Make a blow dart gun.

11.  Take a trip to a shooting range.  If you don’t have a gun of your own, some ranges have them to rent.  Take a friend or your spouse if you can and do some shooting.

12.  Build a shooting bench.  Downloadable plans at the link.

FOOD STORAGE Projects

13.  Build a space saving can rotator rack:  or this one that’s a little more finished looking (read: takes longer)....  You could also make alarger standing unit if you’re really crafty with wood and tools.

14.  Add some “earthquake proofing” to your food storage shelving.  See this post at Prepared LDS Family for some great ideas and be sure to scroll down into the comment section as well.

15.  Get in your food storage room and do an inventory or some organizing.

GARDENING Projects

16.  Build a cold frame for winter gardening.

17.  Plant a container garden.  If you have a warm, sunny room, you can grow some vegetables all year long even in cold climates.

18.  If it’s warm enough where you live, get outside and plant something.

GENERAL SURVIVAL Projects

19.  Make a paracord survival bracelet.

20.  Protect your electronics with your own homemade metal trash can faraday cage.  Check the video at the  previous link and click here for some instructions on how to make one (scroll WAY down the page to get to the pictures).

21.  Try picking a padlock with a soda can.

22.  Put together an important documents binder.  Here is a starter list of documents you’ll want to include.

23.  Put together a survival kit in an altoids tin.  There are many variations on this type of kit.  You can do a google search to get ideas of what people are putting in theirs, or head over to Field and Stream for a starting point.  Have a little more time and money?  Put together a full 72 hour emergency kit for yourself or your family.

24.  Write down your evacuation plan including what you’re taking, where you’re going, and a meetup plan in case someone isn’t home at the time you need to leave.  Include any other family members that may be affected.  I like having a 10 minute list and then an additional items list if you have a little more time before you have to get out of your house.  If you’re feeling really ambitious, run a mock evacuation drill with your family!

25.  Build your very own composting toilet.  With only one bathroom in our house I’ve seriously considered this numerous times–maybe this weekend is the one I set out building one of these!

Views: 279

Reply to This

Replies to This Discussion

8. Make a Torch:

Torches Day and Night

Torches 101

I’ve been in nine wilderness survival situations in my life, mostly due to bad luck or sheer stupidity. On two occasions, I had to improvise a torch in the wild. While I had reasonable success, it was enough to motivate me to research and practice the fundamental concepts of torch making. The result is four approaches to making a torch in the wilderness.

What defines a successful survival torch is its ability to burn for a sustained period of time. Anything flammable from cardboard to pine needles will burn for a while, but after seconds to a minute, the flames are gone. A true torch keeps on burning. That’s critical if you’re relying on it to light your way in the deep woods at night.

The challenge of making a torch in the wilderness is your location, the time of year, local weather, and the general availability of torch-making materials.

Snow Covered Plant

Fashioning a torch after a blizzard may seem like an impossible task, but it can be done. That’s why it’s a good idea to understand the concept of what makes a torch effective and how to construct it from scratch.

Torch Burning

What allows a torch to keep on burning is the combination of the types of materials that are burned and how they are bound to the end of the torch. It’s actually pretty easy to make a torch out of rags and kerosene, but how many people have access to kerosene in a survival situation?

Rags are actually a little easier to come by in the wilderness if you’re willing to burn your T-shirt, but if you need additional torches, you’re going to need to find other resources. Unless you enjoy being naked and afraid.

Approaches to a Torch

Like most things, there’s more than one way to make something like a torch.

The approaches we’ll explore assume a survival situation and limited tools and wilderness resources, although you may have a couple of useful items in a survival kit like a knife or a hatchet on your belt. That’s fair because you’ll also hopefully have a way to light your torch with matches or a firestarter from that same survival kit.

These torches can burn from 15 minutes to an hour or more. It all depends on the fuel used for the torch and how it’s bound to the handle.

9. Introduction: Building a PVC Bow
Building a PVC Bow

These simple instructions will help you to build a very cost effective practice/training bow from easy to find materials. Building a PVC bow is quite simple and can be done by most people with only a few tools. This project is one that most people could complete in less than an hour. PVC pipe bows are a very simple way to get into archery and are a cheap practice option if you already are.

Warning: Children should be supervised at all times if allowed to use these bows as they are weapons and can cause serious injury if misused.

Warning: When using any tools be careful to use any necessary safety equipment and practice safe usage of the tools. Failing to do so can cause injury.


Step 1: Gather Materials

Gather Materials
Gather Materials
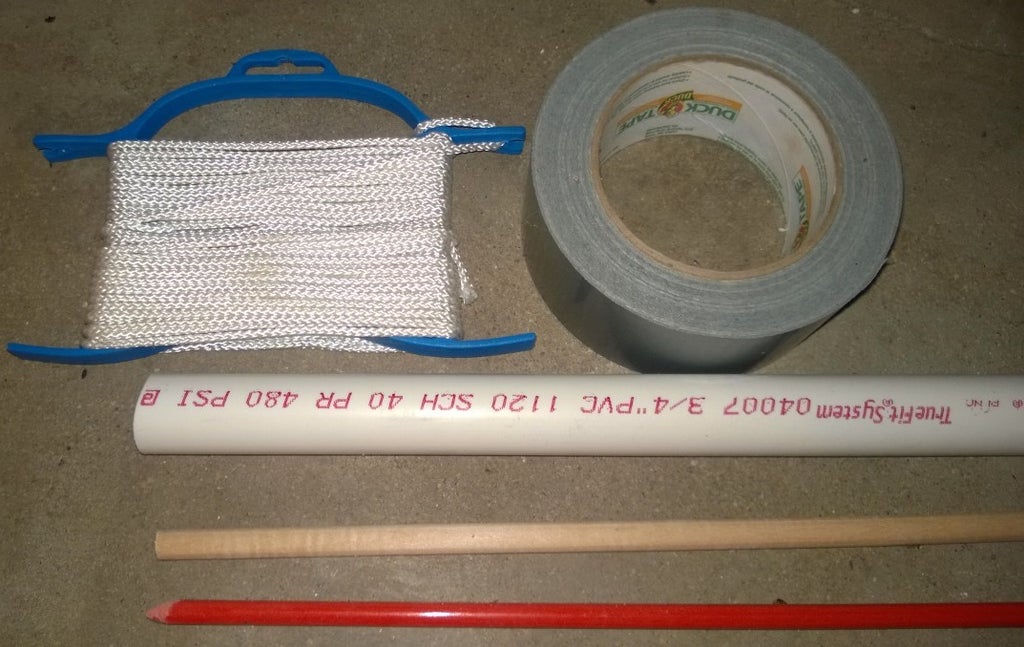
  • About 6ft of 3/4 inch PVC pipe
    • White schedule 40 pipe works well and is easily available
  • A good length of thin high strength rope (more than 8ft and at least 50lb breaking strength)
    • Polyester blend 550 paracord works if available
    • Some tent lines are rated strong enough
  • A few 5/16 in diameter fiberglass rods 4 feet long
    • These are used in reinforcing the bow and are optional if making the standard bow
    • These can be easily found at some hardware stores and are commonly used in lawn reflectors
  • A few wooden dowels around 1/4 - 3/8 in diameter
    • This is only if you wish to make your own arrows
    • Look for straight grain along the length of the dowel
  • Duct tape or other strong tape

Tools list:

  • Something to cut PVC such as a hacksaw
  • Something to cut dowels if you wish to make your own arrows
  • A knife
  • Measuring tape


Step 2: Prepare the Pipe

Prepare the Pipe
Prepare the Pipe
  1. The first thing that you need to do is to determine your bow's desired length.
    • One way to do this is to first determine your draw length. Hold your arms out perpendicular to the ground and measure from fingertip to fingertip dividing that distance by 2.5. Then refer to a chart similar to the one here.
    • Another way is to simply make the bow roughly twice your draw length calculated in the same way. This produces a slightly shorter bow than in the chart.

      Note: The longer you make the pipe the lighter the draw weight will be, due to material limitations, so you can shorten the bow's length if you wish to keep a higher draw weight. Your bow's length does not have to follow either guideline listed above.
  2. Now that you have your desired length, cut the PVC pipe to length adding about 2 inches to the bow length you just found.
  3. Now that the pipe is cut to length, measure in 1 inch from both ends and make a mark.
  4. Now cut a shallow slot just deep enough for the string to slot into firmly on the marks.
    • Cutting just deep enough to make it through the outer wall of the pipe is roughly deep enough.
    • Make the cut slightly narrower than the rope when stretched slightly.

      Warning: Take care when making these slots in making sure they are lined up as much as possible on the same side of the pipe as these will hold the string in place and keep it from sliding off the bow during use.
  5. Smooth the cuts you just made making sure to not widen it too much further. At this point the bow string at tension should snap into the slot with slight pressure.


Step 3: String the Bow

String the Bow
String the Bow
String the Bow
2 More Images
  1. Take the rope and tie a loop into one end just large enough to slip over the end of the pipe.
  2. Slip the loop over the pipe and seat it into the one of the slots.
  3. Hold the cord, still in the slot, along the length of the pipe.
  4. Tie another loop into the cord about 5-6 inches from the end opposite the one the cord is already slotted into and trim the excess cord.

    Note: If you plan to reinforce the bow skip steps 5-6 for now
  5. Now place the already seated end of the pipe on the ground so that the pipe runs at an angle behind you and the end is under or slightly ahead of you.
  6. Using your leg as a pivot, bend the top of the pipe from behind you forwards until it is curved and slip the second loop over the end slotting it into the second slot.
  7. Check the bridge height.
    1. From the center of the strung bow measure from the pipe to the string.
    2. If this length isn't around 6-8 inches, adjust the loop position to shorten or lengthen the string adjusting the bridge height.
  8. Use a lighter to singe the ends of the string so that it cannot fray as easily.

    Warning: Keep a firm handle on the pipe as it can snap back and hit you if it slips.


Step 4: Reinforce the Bow

Reinforce the Bow
Reinforce the Bow

Note: This step is optional but recommended as it will strengthen the bow and increase the draw weight.

  1. Measure out four lengths decreasing lengths of fiberglass rods.
    • For bows around 5ft lengths of 12,18,30,36in work well
    • For bows around 6ft lengths of 4,3,2,1ft work well
    • Feel free to modify the lengths as long as you get 4 rods in decreasing lengths
  2. Cut the four rods to the determined lengths.

    Warning: Cut fiberglass will cause discomfort or irritation if it comes in contact with the skin. Wear protective clothing and cut a well ventilated area to help keep the dust and shavings away from yourself.
  3. Mark the very center of each of the cut rods.
  4. Use the tape to secure the four rods together in a bundle.
    • Make sure that the center marks are all aligned together.
    • The bundle should be wrapped tightly in tape but adding only minimal thickness to the bundle with the tape.
  5. Insert the now wrapped bundle of rods into the pipe.
    • If the bundle is loose add a little more tape to make the bundle snug in the pipe but not too tight that it becomes difficult to move in the pipe. The goal is to keep it from sliding in the pipe during use.
  6. Center the bundle in the pipe as closely as you can.
  7. Refer back to steps 5-6 of the "Stringing the Bow" section to string the bow for use.


Step 5: Make Arrows

Make Arrows
Make Arrows
Make Arrows
Make Arrows

Note: Bought arrows can be used as long as the nock will fit onto the string. Self made arrows can be an inexpensive alternative to the bought arrows that can be used for general practice.

  1. Determine the desired arrow length.
    • You should make the arrow a few inches longer than your draw distance.
  2. Examine the ends. Find the one with the straightest grain for the longest distance.
  3. Cut the dowel to length cutting off of the opposite end as the one you just found to have the best grain.
  4. Cut the nock.
    1. Examine the end with the straightest grain for which way the grain runs.
    2. Cut a small groove in the end of the dowel perpendicular to the grain slightly thinner than the string.
      • The string should be able to snap into the groove and stay in but be able to come out easily.
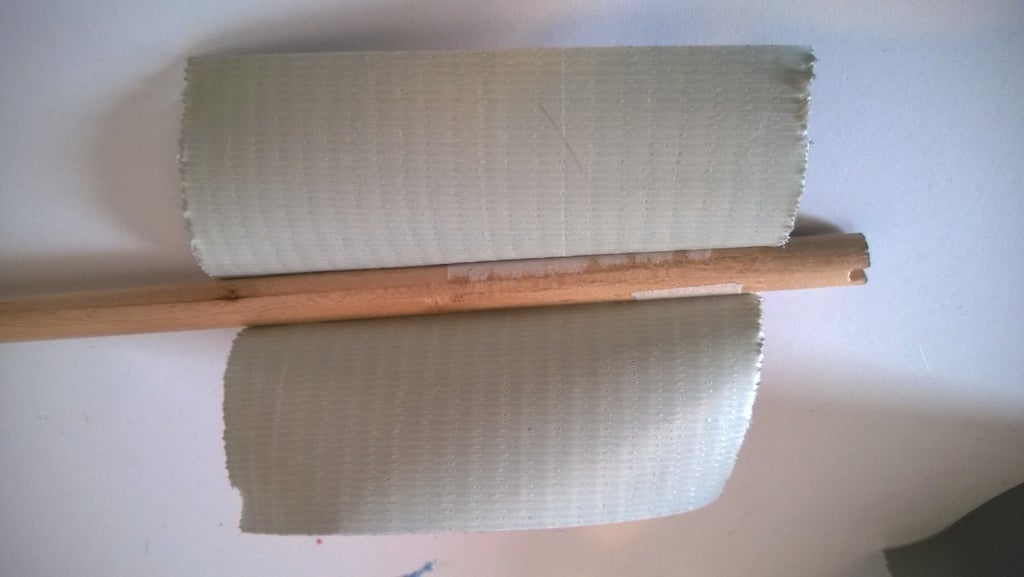
  5. Attach Fletching (Optional)
    • Feather fletchings can be glued onto the arrow using a jig.
    • A cheap method would be to use duct tape to simulate feathers.
      1. Attach a short strip of tape to the shaft.
      2. Attach another strip of tape across the shaft from the first.
      3. Fold it onto the first.
      4. Repeat for as many fletchings as desired.
      5. Trim the tape to a feather shape.
        Warning: Duct tape feathers don't fold as well as real feathers so wear gloves when shooting as the tape can cut your hands when shooting.
  6. Attach arrowhead (Optional)
    • For my general practice arrows I do not use tips I simply sharpen the point end with a knife.
    • Glue-on tips can be found that can be attached after grinding the tip end it into a cone shape.
    • Tips can also be made and glued into a notch in the tip end and then securing it with a thin string wrap.


Step 6: Wrapping Up

Wrapping Up

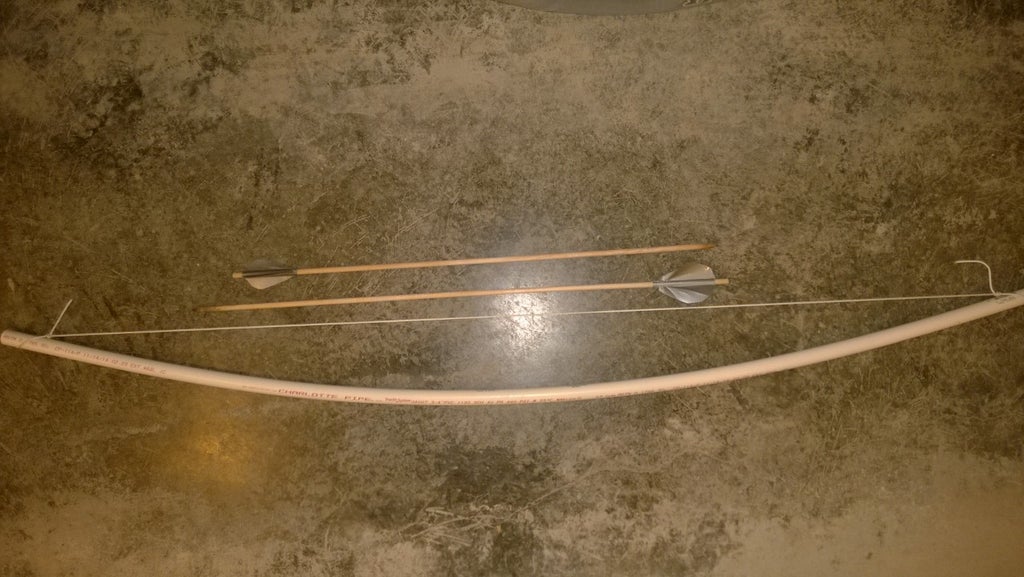
Congratulations you now have a finished PVC pipe bow. With this bow you will be able to practice your archery skills or learn some new ones. These bows are simple enough to make that they could very well come in handy in a survival situation.

When storing your bow you should unstring it to keep strain off of the pipe and the string. This will make it last longer.Over time the PVC will weaken and can break if stored in direct sunlight or is under strain so proper storage can be very useful in prolonging the life of a PVC bow. If you notice any cracks or deformities in the pipe over time do not use the bow as it can break during use and cause potential, though unlikely, injury. Simply replace your pipe if it starts to wear out.

RSS

Wicked Books

Our Sponsors


View more gifts at Zazzle.

WICKED ZOMBIES members appreciation.

The WICKED member who has unyielding Dedication and Loyalty to the KOMRADZ:

Priest

The WICKED member who has Outstanding Constancy:

Jessie W. Garrett III

The WICKED member who Contributed the most Original Zombie Discussions and Replies:

saint.357

They will receive a WICKED ZOMBIES Goody Box with Wicked Treats.

Blog Posts

Going through a lot


   Well, wanted to juststop in and check on things...Been a long time since I have stopped by...Well things are not going as well as I would have hoped, but, you know, that's life...

   Some good things are my son, has turned 18 and has also graduated high school...I'm very proud of him...He has plans of going back to school after the getting a job and saving money for the school with the music production studies he wants to do...So I am very proud of…

Continue

Posted by Jessie W. Garrett III on June 26, 2023 at 1:00am

© 2024   Created by Komrad Venessa Wicked☭.   Powered by

Badges  |  Report an Issue  |  Terms of Service

Groups Forum Videos Photos Blogs Invite You Friends My Page Main Page